Thursday, April 30, 2009

#117_Potatoes 'N Cream

Potatoes 'N Cream

This is one of the dishes that I made for our
Easter dinner this year.
I better post the recipe before Easter comes again.
It is easy to make and yet a very elegant way
to prepare a potato dish and
goes really well with any kind of meat
such as roasts, b-b-q, steaks, etc.
It is so creamy and so flavorful that you will not miss the gravy.


Ingredients:
6 large potatoes, peeled and sliced long like french fries
1/2 pint heavy cream (not whipped)
1/2 can evaporated milk
salt and pepper to taste
1/2 stick butter, cubed
1/2 cup chopped onion
2 cups grated cheese

Procedure:
Put potatoes in a greased baking dish
Add in milk, cream and seasonings (salt and pepper)
Spread chopped onion on top
Dot with butter
Cover dish with aluminum foil
Bake in a 350 degrees oven for 1 hour
Take out the foil and spread the grated cheese on top
Return to oven uncovered and bake for another 5 minutes


This recipe can be easily doubled or tripled.
Most of the time I use 5 pounds of potatoes for our family
in a 10"x15"x2" baking dish increase the cream to
1 pint and evaporated milk to 1 can.
Put more cheese on top.

Very creamy and really good!!

Wednesday, April 29, 2009

#116_Jambalaya Chicken on Three CheeseTortellini or Four Cheese Ravioli

Quick and Easy Cajun-Italian Sauce on Pasta

This is a very versatile sauce that complements most pastas,
but my favorites are the Four Cheese Ravioli
and Three Cheese Tortellini.


The reason this is fast and easy dish to do is that I used pre-cooked chicken, actually, rotisserie chicken from Costco. Of course if using fresh chicken, you need to saute it longer and simmer longer. I even used the heat-n-serve kind of sausage. So actual cooking time is under 30 minutes.


Here's the recipe for the Jambalaya Sauce:

( this recipe is recycled from Jambalaya on Pasta, recipe #69. I changed the recipe around a little to use Buitoni product).

2-3 tbps. olive oil
1 small onion, chopped
2 pieces chicken breast, pre-cooked, sliced in chunks
1 package breakfast sausage, sliced
2 tsp. Cajun seasoning
1 tsp. garlic powder
1 15 0z. can diced tomatoes
1 15 oz. can tomato sauce or (2 @ 8 0z.)
1 small carrots, sliced thin
1/2 of green bell pepper
1/2 of red bell pepper
2 ribs of celery, sliced
Chopped spinach

1 pkg. Four Cheese Ravioli or Three Cheese Tortellini


Directions:

1) Cook the pasta according to package directions. Drain and set aside.
2) In a large skillet heat the oil over medium heat. Add the onions, saute until onions are translucent.
3) Add the sausage, the cooked chicken, the Cajun seasoning and garlic powder. Saute for a couple of minutes.
4) Stir in the diced tomatoes and the tomato sauce and simmer for about 2-3 minutes.
5) Add in the carrots and celery and continue to simmer for 1 minute.
6) Add in the red and green bell peppers and spinach. Stir well.
7) Transfer the drained pasta to a serving platter or bowl and pour sauce over pasta.
Or mix pasta with the sauce and transfer to a serving platter.

SERVE HOT. BON APPETIT!!

NOTE:
1) If you can make your own cajun seasoning it is better so you can adjust the salt. I find the store-bought ones have plenty of salt in them.
2) You can add pork loins and shrimps to be more Jambalaya-ish
3) If using fresh chicken, you need to saute it longer and simmer longer until the chicken is tender.

Thursday, April 23, 2009

#115_Roast beef Fajitas in Lettuce Cups


Roast Beef in Lettuce Cups

Some restaurants call this Lettuce Wrap where
they bring everything to your table
and you have to assemble them yourself.
I saw Rachel Ray made this in her show and she called it
Lettuce Cups.
I think I like the sound of that better.
Whatever you call it, this is an excellent idea to have a healthy sandwich specially
when you have been over eating carbs like I have.
With the left over roast beef from Easter sitting in the freezer,
I prepared this meal in a less than 30 minutes.

You can put anything you like in your fajitas, but the basic ingredients
are lettuce, onions, red and green peppers, steak or chicken
or a combination of steak and chicken.


The Meat Fillings

Thaw out the roast beef if it has been frozen,
then slice the meat into strips. Set aside.
Heat some olive oil in a skillet over medium heat.
Add the sliced onion and saute until they are wilted.
Add in the roast beef, sliced green peppers and sliced red bell peppers.
Season with salt and pepper.
Saute this mixture for about 8 minutes and
you have a fabulous meat filling for fajitas.


You can customized your fajitas by putting some
guacamole, shredded cheese, tomatoes or salsa
on top of the meat fillings.

I like my fajitas simple....
I made it by spreading some mayo on the lettuce,
put some meat mixture on the lettuce and
topped it with slices of avocado.

Rolled it up and secured the lettuce with a toothpick.
Simple but really delicious!!

*****

My husband prefers his fajitas with flour tortillas

Heat up the tortilla in the microwave for about 1 minute
and spread some mayo on it.
Line a piece of lettuce on the tortilla
and put some of the meat fillings on it.

Roll up the tortillas and secure them with toothpicks.
My husband prefers his with just meat fillings...nothing else.
no cheese, no avocados, no tomatoes.
Whatever makes him happy!!!


Wednesday, April 22, 2009

#114_Reduced Eggs Ensaymada


This is a Reduced-Eggs Ensaymada recipe
using only 4 whole eggs and takes 3 risings
(If this recipe is a little complicated for you, you can use the
Basic Sweet dough recipe #178, click here.)


For the Sponge:

1 cup whole milk
1 tbsp quick rising yeast or instant
1 tbsp sugar
1 cup bread flour

1) Warm the milk in a bowl in microwave.
2) Stir sugar in the milk and sprinkle yeast over the mixture. Use a whisk to dissolve the yeast.
3) Let this mixture sit for a few minutes until it becomes foamy about 10 to 15 minutes.
4) Mix in the flour and stir with a sturdy wooden spoon.
5) Cover with a plastic wrap and let it rise for about 20 minutes or until bubbly. This will be a sticky, wet dough but should not be runny.
This mixture is called sponge and will be mixed in with the dough.


The Dough
3/4 cup milk, very warm
1 1/2 sticks butter, softened
2/3 cup white sugar
the sponge
1 tsp vanilla extract
4 large large eggs, slightly beaten (1 cup)
4 1/2 to 5 cups bread flour
1 tsp salt
1 tsp dough enhancer (my secret ingredient)
1 tsp vital wheat gluten (another secret ingredient)

1) Put everything in the bread machine pan or bucket starting with the warm milk making sure the paddles are in place.
2) Use the dough cycle and let the machine do the stirring and kneading.
3) When the cycle is finished, take the dough out and place it in a well-greased bowl and cover with a plastic wrap to rise until doubled in bulk.
This is the SECOND RISING.

Option: Instead of transferring the dough into a bowl, you can leave the dough in the bread machine bucket or pan, put the lid down and let the dough rise until doubled in bulk.


The Traditional Coiled Ensaymada

How to coil the dough:
1) Lightly punch the dough down and take it out onto a floured surface.
2) Divide the dough into half then cut the half into 12 pieces.
3) Do the same thing with the other half of dough, cutting it into 12 pieces, so you have 24 pieces all together.
4) Roll dough into ropes about 8 inches long, fat on one end and tapered on the other end. Take the fat end with your forefinger and thumb and coil dough around tucking the tapered end under.


Braided Ensaymada

5) For braided ensaymada, divide dough into 48 pieces. Twist together 2 ropes. Hold the twisted dough with your forefinger and thumb, and coil the rest of dough around, tucking the tapered end under.

6) Place coiled dough in greased molds.

(Sorry, I did not get to take pictures while braiding the doughs. Burnt Lumpia, a blog, gives a very good illustrations on how to braid the doughs. Click here for the link).


This recipe makes 24 braided pieces using the ensaymada moulds with base measuring
2 1/4 inches in diameter.

If you're using ensaymada molds, grease each mold with shortening, then place the molds on a cookie sheet.

If using cookie sheets without the molds, line the sheets with parchment papers.


The 3rd Rising

This is an important process in order
to achieve a flavorful pillow-soft, but not airy rolls

The picture above is recycled from ensaymada recipe #113.

1) Place the molds with coiled doughs in cookie sheets.
2) Turn the oven on for just 1 minute or until the temperature reaches 8o degrees and then turn it off. (Make sure the temperature is not hotter than 80 degrees).
3) Place the cookie sheet with the ensaymadas below the middle rack, then shut the oven door. Let the dough rise until they are soft and springy to the touch, about 20-30 minutes.

4) Or boil some water in a pot and place this pot right on the oven floor.
5) With the oven door shut, let the dough rise for about 30 minutes or longer.
6) When dough has doubled in size, soft and spongy or springy to the touch, take the pan and pot out and turn the oven on to 350 degrees to pre-heat.
7) Bake the ensaymadas for 18-20 minutes.

You can leave them plain or slather them with butter
then sprinkle sugar and grated cheese on top.
They are good for meriendas or for breakfast.

Notes from MaMely
1) You can use this recipe for almost any kind or shape you want such as for dinner rolls, croissant rolls, Parker house rolls, etc.

2) If you want to let the dough rise overnight in the fridge, here's some tips:
a) use regular yeast, not instant as the dough might rise too fast if you use the instant kind.
b) after the dough cycle if finished, take the dough out and place it in a well greased bowl, turning it upside down to coat the other side of dough with grease or oil. Cover the bowl with plastic wrap and put it in the fridge overnight,(about 8 hours). The next day take out dough and let it stand for about 1 hour then proceed to the rest of the procedure, i.e. punch dough down, shape, etc.

3) Store this kind of breads in plastic bread bags or in air tight containers to keep them soft for days. Microwave old rolls for 10-15 seconds to make them oven-fresh.
Do not store them in paper bags as they will get hard. French breads and baguettes kind of breads are stored in paper sacks to keep their nice crusts.

Important bread-making tips from KAF bakers
http://www.kingarthurflour.com/recipes/100-whole-wheat-sandwich-bread-recipe
  • Don't bother heating the orange juice to lukewarm; you can use it straight out of the fridge. The orange juice won't add its own flavor to the bread, but will mellow any potential bitterness in the whole wheat.
  • If you're kneading bread by hand, it's tempting to keep adding flour till the dough is no longer sticky. Resist the temptation! The more flour you add while you're kneading, the heavier and drier your final loaf will be.
  • The amount of liquid you use to make the "perfect" dough will vary with the seasons. Flour is like a sponge; it absorbs water during the humid days of summer, and dries out during the winter. Your goal should be making the dough as it's described (e.g., cohesive, soft but not sticky), rather than sticking religiously to the amount of liquid.
  • When making yeast bread, let the dough rise to the point the recipe says it should, e.g., "Let the dough rise till it's doubled in bulk." Rising times are only a guide; there are so many variables in yeast baking (how you kneaded the dough; what kind of yeast you used) that it's impossible to say that bread dough will ALWAYS double in bulk in a specific amount of time.

Thursday, April 16, 2009

#112_Gramma's Little Helper

Thank goodness, that's one thing less for gramma to clean up!!

Benjamin is a little good helper in the kitchen.
He is always willing to clean up gramma's mess.

Thank you Benjamin!!


#111_Birthday Cake


Simplicity & Elegance

Two tiers of cake delicately wrapped with
white chocolate slabs
and
decked up with gold ribbon and caramel sugar.
How simple is that?

And oh, I just looked at it closely...
there's some chocolate shavings sprinkled on the top tier
and around the top of the second tier.
That's a lot of chocolate!!

This cake was made by my sister, Melita, who lives in New Zealand.


Good job sistah!!

Sunday, April 12, 2009

#110_Easter Dinner

Bunny Rolls


My husband said they look more like pigs than bunnies.
Maybe he is right, but the G'kids thought they are bunnies.
Maybe it is because I had told them that
I made them "bunny rolls" before they saw them, ha-ha!!

So if my husband really thinks these look like pigs
then I might as well call them lechon rolls. LOL!!
Translation of lechon in English?
Roast pig.
Oink-oink!!

Dinner Rolls baked in muffin pans

I used the Potato Dinner Rolls recipe
Click here for the recipe


Chocolate Cupcakes
with cream cheese frosting
garnished with dyed coco
nut flakes and jelly beans

Amy, our daughter usually makes these cupcakes
and since she worked all night last night
and will be working again tonight as a nurse,

I don't think she will be making them for today.
So I attempted to make them myself.
I didn't do as good of a job as she does but I want
to have something
Easter-y for the Gkids.


G'daughter Lindsey taking a bite off a cakeball


Vegetable Casserole with Alfredo sauce,
topped with cheese, (posting recipe later)


Angela made this cake and she got the recipe online.
It is a very good cake except I don't like its name.
It's one of those better than s_ _
kind of cake. I think she changed the name to
"Better-than-Brad Pitt Cake" though.


Amy made some of her signature sugar cookies
which was a hit today as always.

She also brought some green salad and spiral ham, both not pictured.

I made some Banana Cream Pie, not pictured,
and Sally brought some pumpkin cookies, not pictured either.
It was hard to keep up with all the food.


This is Potatoes 'N Cream
The recipe is in my former company's cookbook.
(not my company...I meant, the company I used to work for)
I will post the recipe later.

Charlie and Nikki brought some Scalloped Potatoes, not pictured
It was really good!


Roast Beef

7 1/2 pounds of rump roast,
4 hrs in the oven and finished cooking it in the crockpot
for 2 more hours
for moist and tender roast.

We had a nice Easter dinner as always,
hope you did too!


Thursday, April 9, 2009

#109_Lumpia Shanghai or Eggrolls

Lumpia Shanghai
is a very popular side dish in the Philippines
and it is served in most gatherings
along with pancit and other delicious dishes and whatnot.
Everybody knows what Egg rolls are and most everybody knows
how to make it,

therefore, it doesn't need much introduction.

I just wanted to share my version of making lumpia
which has cooked meat in the fillings

and so there is a little bit more work involved,
but I guarantee you, it is worth all the effort.

After trying this cooked meat fillings,
you will not want to go back to the raw meat fillings anymore.

Here's my recipe:

The Lumpia Filling:

1 lb. ground beef
1 lb. ground pork
1 med size onion, sliced in chunks
1 tsp. onion powder
1 tsp. garlic powder
Salt/Pepper
1 med, size carrot
2 stalks celery, finely diced
6 cloves garlic, chopped very finely
2 med size potato, boiled
Egg roll wrappers


1) In a skillet, over medium heat, brown the ground pork and ground beef together with the sliced onion without using any oil. Stir occasionally.
2) When the meat is no longer pink, discard the fat. ( I do this by placing the meat in a colander to drain the fat off).
3) Put the drained meat back in the skillet and add the onion, salt and pepper, garlic powder and onion powder. Add a little water (about 1/4 cup) and cover. Simmer until meat is tender, about 20 minutes, stirring occasionally.
4) Put the meat back in a colander to drain. At this point you need to drain the meat really well. (I usually put the colander in a bowl with plastic wrap and put it in the fridge overnight. If you're in a rush, you can squeeze out the liquid by using a piece of cheese cloth.)
5) Put the well drained meat in a food processor and pulse it for a few seconds. You might need to do this in 2 to 3 batches.
6) Put this in a bowl and add the diced celery and the chopped garlic.
7) Wash and grate the carrot using the coarse side of the grater, then mix it with the meat mixture.
8) Peel the boiled potatoes and grate them using the coarse side of the grater. Mix it with the meat mixture. This is the binding agent.
9) Mix everything together really well.


Preparing to Wrap the Lumpia:

A) Make a paste
In a pot, dissolve about 2 heaping tbps. of all purpose flour in 1/4 cup water. Cook over medium heat stirring constantly until it reaches a consistency of a pudding. You may add more water if necessary. Set aside.
Use this homemade paste to seal the seams of the lumpia. Some people use egg white, but I prefer to use this paste.

B) Separate the lumpia or egg roll wrappers.
The wrappers are stuck to each other in a package like the packaged sliced cheese. Separate them by carefully pulling them off one by one and stack them on a plate.
Make sure to cover the stack of wrappers with a damp kitchen towel to prevent them from drying out as these wrappers dry out easily. When they dry out they become brittle and tend to crack. Good wrappers are a little stretchy and malleable. If they are brittle, that means they have been exposed to air or they are just plain old. Better not use them.


Most egg roll wrapper packages have directions on the back
on how to wrap the lumpia.

I like this diagram because it is self explanatory and very helpful for beginners.


Wrapping the Lumpias:

I like using the wrappers that are pre-cut to 4x4-inch
so I don't have to cut up the lumpias before frying them.
These wrappers come in 50 pieces per package and are
available in most Asian or Oriental stores.
This recipe can make about 150 pieces.

1) Place a wrapper on a clean work surface with one pointed end facing towards you.
2) Put about 1 tbsp. of filling on the wrapper, below the center of wrapper. (see first diagram)
Make sure the filling is not bigger than a forefinger.
3) Bring the corner closest to you over the filling and then bring the left and right sides towards the the middle and roll it out, leaving a little bit of the other pointed end open and apply some paste around this end to seal, see last diagram.
5) Repeat until all the fillings and wrappers are used up.


There are 2 ways to cook these Lumpias:
Frying in hot oil
Bake in the oven


To fry Lumpias in hot oil:
In a heavy skillet or fry pan, heat some vegetable or canola oil
Fry the wrapped lumpias until golden brown and crispy.

Drain fried lumpia on paper towels and serve with your favorite dipping sauce.
Most Filipinos enjoy the simple dipping sauce made with
vinegar, garlic, salt and pepper with some hot peppers.
You can use sweet chili sauce as well, which are available in Asian stores.

Notes:
1) You can use eggs instead of the grated boiled potatoes to bind the ingredients together.
2) You can either freeze left over fillings for later use or make 150 pieces of lumpia and freeze them.
3)To fry frozen lumpia, do not thaw them out, otherwise the wrappers will become soggy and will break apart while frying them.
4)* To test if the temperature of the oil is perfect for frying the lumpia,
stick one end of lumpia in the oil, when it sizzles good, it is ready.

Wednesday, April 8, 2009

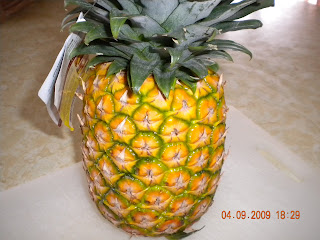
#108_How to Cut Fresh Pineapple the Filipino Way

I love to mix in fresh pineapple with our smoothies,
so I've been buying and cutting fresh pineapple for a long time,
but I never paid much attention
to the labels that are attached to them until today.

The instructions was accompanied
by pictures showing 3 steps on how to cut the pineapple.
This inspired me to post how Filipinos in the Philippines cut pineapples
as opposed
to the instructions on the label.
We don't cut away too much of the flesh.... you'll see what I mean.
All you need is a clean cutting board and a very sharp knife.


On a cutting board, lay the pineapple on its side
and slice off the crown and the bottom end.


Lay the pineapple on one end, usually on the bottom end.
Starting from top to bottom, cut the skin off in thin strips
until all of the skin is removed.
Don't worry about the "eyes" at this point.


You will notice that the "eyes" form diagonal lines.
Take your very sharp knife and cut out those eyes
in an angle, forming v-shape following the diagonal line
and just deep enough to take those "eyes" out.


There you go! Ready for slicing.

Don't forget to rinse it first with cold water
before slicing.


Slice the pineapple according to your personal preference.
You can either slice it into rings or lengthwise.
If you decide to slice it lengthwise,
cut it in half, then into fourths.
If serving it as a fruit, cut out the core which
is the hard part in the middle.

If using it for smoothies, you don't have to cut out the core
as they can give you additional fiber.

Here's a couple of ideas to serve fresh pineapple....


just a reminder....

skewers are dangerous for little kids!!!!