Thursday, November 27, 2008

Johnson's Thanksgiving Dinner (Check out related pictures in my other blog: pinayinutah.blogspot.com)

Ahhhhhhhhhhhhhh...sumpal la! Nalpasen apo!
I'm still so exhausted so I will be posting some recipes maybe next week. In the meantime, here are pictures of some items which I took while I was cooking them this morning. I found out that I can't do both cooking and taking pictures at the same time, specially when I am running behind the schedule. Like today, it was very hectic. I didn't get to take a lot of pictures.
Butterball turkeys don't come with pop-up timers. Therefore I bought a pop-up timer and stuck it into the turkey breast before I put it in the oven. When I took the bird out of the oven, when the timer popped up, the turkey was nice and golden brown. Everybody at the dinner said that the turkey was so moist and tender.


Swedish meatballs cooking in a crockpot


I put the spiral ham in a roaster oven to bake while I roasted the turkey in the big oven


Stuffing with Italian sausage


Bulalo, my favorite dish and comfort food, with yam, potatoes, green cabbage, plantain banana, bokchoy, and napa cabbage. This is one dish that you can make ahead of time. I boiled the meat a few days before and just before serving, I reheated it and put in the veggies.
I peeled and mashed 20 lbs. of potatoes and put it in another roaster oven which I borrowed from my friend, Aida, to keep the mashed potatoes warm.

What's for Dessert? ( Check out related pictures in my other blog: pinayinutah.blogspot.com

Cheesecakes, Cheesecakes and Cheesecakes!!!


Cherry cheesescake

Raspberry cheesecake


Strawberry cheesecake


The three kinds of cheesecakes shown in mini-tart shells or mini-pie crusts


Cherry cheesecake in a mini pie crust


Notes:
I will be posting the recipe next week.
I didn't have a chance to take a picture of the dessert table because I was so busy. Aside from cheesecakes, I made German chocolate cake, crema de fruta, and pistachio salad.
My friend Erlinda made some fruit salad with cottage cheese. Charley made some frosted brownies and pumpkin squares. Pumpkin pies were made by Wayne and Amy. They were all sinfully delish!!
The brazo de Mercedes con ube haleya didn't turn out good and it is not worth blogging about. As I was rolling the meringue, it cracked across that I couldn't roll it up. So I just made it into a flat cake with layers of the meringue, halaya, yema. Then I topped it with the other half of meringue. It tasted like brazo with ube, but of course didn't look like brazo because it's a flat layered cake. I decided to make one another time.

Saturday, November 22, 2008

#38_Ube de Jalea or Halaya Ube

Jalea de Ube


This is one of the "make-ahead" items on my list for the Thanksgiving dinner. It was getting late and the lighting wasn't very good, but I went ahead and took this picture anyway so that I can post this entry tonight as I'm afraid I won't be able to do it in the next few days.

Some people might wonder what ube is? It is a root crop which is sometimes called purple yam used in making desserts. Mr. Wiki (pedia) can tell you more about it.

I will be making a Brazo de Mercedes with Ube on Wednesday for my Filipino friends who are coming to the dinner. For the halaya ube, I can make it days ahead, so that will be real helpful with the time element. As the chefs in Food Network say, a sucessful dinner is all about timing. I hope so.

I only need one batch for the cake but I doubled the recipe (above picture) because I love to eat this dessert.

The recipe is really simple as you can see it has only 3 ingredients and if you want a good workout for your arm, you'll want to try making this dessert.

Here's the recipe for the Ube de Jalea:

1 package grated frozen ube, thawed out

1 stick butter

1 can condensed milk


Procedure:

1) Pass the thawed out ube through a sieve because you want this to be really smooth.

2) Put all the ingredients in a non-stick pan and cook over medium heat, stirring constantly until thick.

3) Press the cooked jalea onto a buttered dish.

Notes:

1. Because I will be spreading the ube halaya on the merigue (for the brazo cake) I made it a little thinner than I normally do.

2. I usually mix in about 2 tbsp. of mochico with just enough water to dissolve it, into the halaya mixture for body and better texture.

Friday, November 21, 2008

Let's Talk Turkey

Gobble,Gobble! My quest for a 22 pound turkey


The biggest turkey I found only weighed 19.91 pounds

Thursday, November 20, 2008

Thanksgiving Dinner Menu

Exactly one week from today is Thanksgiving Day. I have been busy planning and preparing for the dinner. There's going to be about 45 people for the dinner. I might not have time to post an entry between now and Thanksgiving because I have tons of stuffs to do. I will also squeeze in my Christmas lights and Christmas decorations outside before it gets too cold to do it. I hope I will have time to take pictures of the food so I will have some materials to post in this blog.

Here's a sample of the Johnson family traditional Thanksgiving dinner menu:

Roast turkey ....and all the trimmings, such as gravy, mashed potatoes, stuffings/dressings, and ham. I hope I will be able to find a 22-pound turkey. I looked today, but the biggest I saw was 20 lbs. I will be making some cheesecakes which is my husbands favorite dessert
The kids will be bringing the drinks, side dishes and desserts, desserts and lots of desserts

I will have about 15 Filipino friends at the dinner so maybe I will make the following:

Crema de frutas, ube brazo de mercedes and maybe some nilagang karneng baka (pochero? or bulalo?)

Sunday, November 16, 2008

#37_Strawberry Shortcake

Scrumptious Strawberry Shortcake
(SSS)

Strawberry shortcake is my #1 dessert. It is a popular summer dessert because summer season is when strawberries are in abundance.

It is strange to see a lot of strawberries this time of the year, but last week this one store had plenty of them and their price was like it was last summer. As soon as I saw these beautiful California grown strawberries I knew what I was going to do with them. The first thing that came to my mind was Strawberry Shortcake! The second thing was to freeze them for smoothies. I bought a case of 8 lbs. for less than seven dollars, that's an unbelievable price for winter season.

Strawberry Shortcake it is!!

This dessert comes in 3 parts: (1) the base, which can be beignet, scone or biscuit (2) filling, which is prepared by, first, washing, hulling and slicing the fruit, then the strawberries are mashed and sprinkled with white sugar and then it is set in the fridge for few minutes for the sugar to suck the juice out of the strawberries and becomes its own syrup (3) the topping which is made of real heavy cream, whipped with sugar. This is the traditional way or the old-fashioned way.

The above procedure is far different from this recipe that I'm sharing with you. This version is quick and easy and the modern way. I'm sure those who are strawberry shortcake connoisseurs will frown upon this recipe as I usually use store-bought pound cake, or angel food cake, or some dessert cups. Sometimes I use just white cake made from the boxed cake mix for the base. I don't think I'd use biscuits for the base though for two reasons: one, I don't like biscuits that much, two, biscuits are their best when they are warm and I don't think I want to eat this dessert with warm biscuits. Well, of course that's just me.

For the filling, I use Danish Dessert to glaze the strawberries. For the topping, I just use good ol' cool whip.
The only part in this recipe that you need to use the stove for is making the glaze or you don't even have to use the stove, just microwave the water instead.

Here's my version of the Strawberry Shortcake which is as easy as 1-2-3:
1) Wash, hull, and slice about 1 lb. of fresh strawberries.
2) Make the glaze following the directions on making "pie glaze" on the back of box of Danish Dessert.
3) Fold in the sliced strawberries.

These are called dessert cups and are made specially for Strawberry Shortcakes.They are just like regular yellow cake made by Hostess Bakery

4) Fill these store-bought dessert cups with the strawberry fillings


5) top them with a dollop of whipped cream.

ENJOY!!

NOTES:

1) The other kind of cake pictured with the dessert cup is angel food bar (cake) also made specially for shortcakes. Slice it up depending on the thickness you prefer. It will give you about 10 slices.

2) If using cake from cake mix, 9 x 13 or 11 x 15, spread the filling on top of cake and slice into serving size squares. Top each slice with whipped cream.


UPDATE: 12-30-09

Since I've perfected making Chiffon Cake, I've been using the chiffon cake or the mamon as the cake base for Strawberry Shortcake. It is so delish, you gotta try it. Click here for chiffon cake, or here for mamon.

#36_German Chocolate Cake

German Chocolate Cake with Coconut-Pecan Frosting


Another simple and easy cake to make would be German chocolate cake with coconut-pecan frosting because you can use boxed cake mix, and the frosting can be made from scratch. It might not look as good as the picture shows because I fouled up with one of the ingredients. I put in the whole can of evaporated milk by mistake, instead of just 1 cup so it took me awhile to cook the frosting down. I had to add a tablespoon of corn syrup so it woudn't be too runny. As you can see, the top is still a little thinner than it is supposed to be, but the taste wasn't affected at all. Still yummy!


Here's the recipe:


1 German chocolate cake mix, bake according to directions on the box
1 recipe for coconut pecan frosting:

Recipe for coconut pecan frosting:

1 cup evaporated milk
3 egg yolks, slightly beaten
1 cup white sugar
1 stick butter
1 1/2 cups shredded coconut
1 cup chopped pecans
1 cup sifted powdered sugar
1 tsp vanilla extract

1)In a deep pan, or pot, preferably non-stick, combine the milk, egg yolks, sugar and butter. Cook stirring over medium heat until thick, (about 15 minutes or til it reaches the consistency of pudding)
2) Turn down heat to medium low, and add the coconut, pecans, powdered sugar and vanilla. Stir for 2 more minutes. Turn off heat. (it might be a little runny at this point but when you spread it on the cake, the frosting settles quickly)
3) Spread frosting on the cake immediately. (it is easier to spread the frosting on the cake while the frosting is warm).
4) Chill in fridge before slicing.


NOTES:
1)This frosting recipe is good for two 8-inch layers, one 9x13 cake and 24 cupcakes.
2)You can use any kind of chocolate cake recipe, i.e. devil's food, milk chocolate, and other chocolate flavors

Saturday, November 15, 2008

#35_SWEET and SOUR MEATBALLS

Sweet and Sour Meatballs over Rice


Years ago my sister Melinda gave me a recipe of tempura chicken with sweet and sour sauce. It is the best sweet and sour sauce recipe there is and it is very versatile as you can pour it on fried fish or on pork tempura or chicken tempura or shrimp tempura.

What makes this sweet and sour meatball recipe extra easy to prepare is that you can make the meatballs ahead of time (recipe #33). The veggies are optional, but if these veggies don't bother you, it won't hurt to add them in the sauce. Actually, they enhance the flavor and the appearance of the sauce.

Recipe for the SWEET AND SOUR SAUCE:
2 Tbsp olive oil or canola oil
1 small onion, coarsely chopped
1 piece carrot, sliced
1/2 of green pepper, coarsely chopped
1/2 of red bell pepper, coarsely chopped
small piece ginger, julliened
1 small can tomato sauce or 1/4 cup ketchup
2 tbsp soy sauce
1/4 cup apple cider vinegar
1/3 cup brown sugar
2 tsp salt
dash ground pepper
1 can (15.25 0z) pineapple tidbits
2 tbsp cornstarch

Procedure:
1. In a skillet, heat the oil to hot but not smoking; quickly saute the onion, the peppers, carrots and the ginger for about 1 minute. Take them out of the skillet and put them in a little bowl
2. In same skillet, on medium high heat, pour in the tomato sauce, soy sauce, and vinegar. Stir in the brown sugar and add the salt and pepper.
3. Take the juice out from the canned pineapple. In the juice dissolve the cornstarch and using a whisk briskly mix it in with the tomato and vinegar mixture making sure there's no lumps.
4. Put the meatballs (recipe #33) in the sauce and continue to simmer for about 10 minutes, stirring ocassionally.
5. Add the pineapple tidbits and the sauteed veggies; simmer until the veggies are heated through


To be continued...MaMely is sleepy. there might be a lot of errors in this post, I will just edit it tomorrow or so.

Wednesday, November 12, 2008

#34_Hamburger Sandwich

A hamburger sandwich is my husband's main staple, it is his "comfort food". He can eat one or two everyday. When he was a young boy, his mom owned a cafe in downtown Salt Lake City where she served hamburgers. I don't know how big those hamburgers were, but she let Gregg eat two hamburger sandwiches at a sitting. Until now, if I make hamburgers at home, he wants two quarter pounders. It is a good thing that when we eat out he only orders one.

At home he eats his hamburger sandwiches with corn chips and tomato salsa. Sometimes I treat him with some homemade fries


I make the hamburgers using the 85/15 ground beef. Season the patties with some seasoned salt or any dry rub on both sides. Sometimes I grill them on an electric grill, but most of the time I cook the patties in a skillet on the stove with 2 tablespoons of water and some Worcestershire sauce. This sauce is a hamburger booster. Cover the skillet and cook these patties on medium low heat until the liquid on the bottom of skillet is almost dried out or when clear liquid comes out of the meat when pierced with a knife. Turn the patties over and cook the other side just until they turned brown.


This is all he wants in his burger sandwich: a huge hamburger patty, a slice of tomato, some onions, a piece of cheese, a piece of lettuce, some ketchup with no pickles, no mayo.


If I fix hamburger sandwiches, it is for Sunday dinners. He'd be happy as a lark with his two burgers and I'd be happy as a maya (a Philippine bird, a tree sparrow) with my rice and adobo or anything Pinoy.

#33_How to Make Meatballs

No-fuss-no-mess Meat balls
Eliminate the greasy part of making meatballs by baking them in the oven
instead of browning them in oil.

Really easy to do, just combine all the ingredients in a bowl and mix together

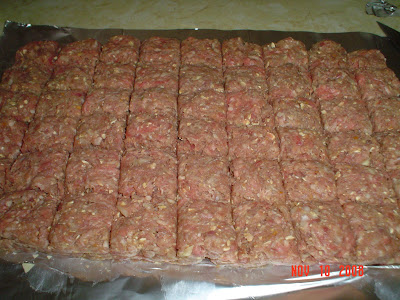
To make uniform size meatballs, pat the mixture into a one-inch thick rectangle. Cut the rectangle into 1 inch to 1 1/2 inch squares. Gently roll each square into balls.

Arrange meatballs in an aluminum-lined sheet pan for easy clean up

Here's the ingredients:
2 lbs. ground beef
1 lb. ground pork
1 cup bread crumbs or oatmeal (see notes)
1 medium onion, minced
3 cloves garlic, minced
2 eggs, slightly beaten
salt and pepper to taste
1 tsp. Mrs Dash
Mix all ingredients together, form into balls and onto a baking sheet; bake it in a pre-heated 350 degrees oven for 45 minutes to 1 hour.

NOTES from MaMely:
1. You can make different dishes using meatballs such as, Swedish Meatball Casserole, Spaghetti with Meatballs, Meatballs with Cream Sauce, Sweet and Sour Meatballs or Meatball Sandwiches, to name a few. I will post some of these recipes when I make them in the near future.
2. Instead of bread crumbs, I use saltine crackers or oatmeal or both. I put them in a food processor and grind them. I also put the onion and garlic together in food processor to finely chop them.

Sunday, November 9, 2008

#32_Spaghetti with Meat Sauce

This is the way my husband likes his Spaghetti: sauce on top of the pasta and sprinkled with grated parmesan cheese


This is how I like my spaghetti: mix the sauce up with the pasta, let it set in the fridge overnight and heat it up in the microwave the next day. This way the pasta soaks up all the flavor in the sauce


An Italian lady once told me that the secret of good spaghetti is in the sauce, and the secret of a good sauce is slow and long simmering.


This recipe is easy and simple but if you want it to be delicious and savory, it takes patience, as it takes more than one hour to simmer the sauce on top of stove or you can use a crock pot and let it cook for 5 hours.


Here's what you need for the sauce:
1 lb. ground beef (85/15)
1 lb. ground pork
1 can spaghetti sauce
1 can (14.5 oz.) tomato sauce
1 cup water
1 medium onion, chopped
5 cloves garlic, minced
1 can (14.5oz.) whole peeled tomatoes, chopped
2 Tbsps canola oil
1/2 lb. Italian sausage, sliced
1 Tbsp. Italian seasoning
2 tsp salt
2 heaping tbsps. brown sugar

Procedure:

1. Heat a large skillet and brown the meat until they are no longer pink
2. Transfer the meat to a colander and drain off the fat
3. Take out the excess grease from the skillet and heat the cooking oil
4. Saute the garlic and the onion until onions are wilted and transluscent. Add the tomatoes and continue to saute for about 3 minutes
5. Add the browned meat and the sausage and saute for another 5 minutes
6. Stir in the tomato sauce and water; then add the seasonings and salt
7. Cover and let it simmer on low heat for 1 1/2 -2 hours stirring ocassionally.
8. Mix in the brown sugar 5 minutes before you take the sauce off the stove
9. Serve over hot spaghetti pasta
Notes:
1. The sauce will be enough for 18 oz cooked spaghetti
2. In the Philippines, we use banana ketchup (mafran/jufran) instead of tomato sauce; and sliced hotdogs instead of sausage, and always ground pork; and add the cooked pasta right into the cooked sauce and mix them together until all the pasta is coated with the sauce. The banana ketchup gives a little kick to the sauce because they are flavored with hot peppers.


Saturday, November 8, 2008

#31_Banana Cream Pie


Calori-fic Dessert!


Forget your calorie counting because this is a calori-fic dessert. I don't know how else to describe it but just that....a calorie-laden dessert and yet it it terrific.

A friend gave me this recipe more than 20 years ago and it has been in the family since then. It is one of a few recipes I never altered or modified because there's no reason to, except for the garnish that I added.


My husband didn't care much for the garnish of shaved chocolate. He said the chocolate takes away the taste of the bananas. Hmmmm, now that I think about it, he did not make sense because his favorite milk shake is chocolate banana. I didn't dispute his criticism then because I actually forgot that he used to order that flavor of milk shake until now that I'm writing about it. He's been on a no-sweet diet since the first of the year until Halloween day when he went nuts over those treats we were giving out. I will not discuss how much candy bars he ate. Well, at least he only had 2 slices of banana cream pie!
Actually, I don't usually garnish it, I just did it today because I want it to look kind of dressed up for presentation and eye appeal. I think though, the bananas and the chocolate blended well together. The chocolate adds texture and color and also flavor to the pie.

The recipe is really simple and easy to make and it only calls for 6 ingredients. It requires no baking, but it is even easier if you use a food processor to mix the pudding as it only takes a minute. If you use a hand mixer to mix it, it takes awhile to get to the spreading consistency.


Here's the recipe:
2 prepared graham cracker pie crusts
1 large (5.1 oz) instant vanilla pudding mix
1 large box (4 envelopes) dream whip
3 cups cold fresh milk
1 (8oz) cool whip or whipped cream, thawed
4-5 bananas, ripe but firm
Procedures:
1. Slice the bananas crosswise and line them up in the prepared pie crusts.
2. In a food processor, combine the vanilla pudding mix and the dream whip. Add 3 cups milk and process until thick,but of spreadable consistency.
3. Spread the pudding over the bananas.
4. Top with cool whip
5. Chill in the fridge for at least 2 hours before slicing
Note:
1. To prevent the bananas from getting dark, sprinkle some Ever Fresh fruit protector found in the canning section of your grocery store.
2. If you don't have Cool Whip, you can use 1 pint of heavy cream and whip it with 1 cup white sugar.

Tuesday, November 4, 2008

#30_ G.O.'s Smoothie


Smoothie for breakfast. A glass for me and two glasses for hubby


Years ago my husband was into juicing. He juiced and mixed up different kinds of vegetables. He liked the juice but cleaning up was a bit of a task. There's a lot of different parts of the juicer to clean afterwards. About 10 years ago, our son Kelly, bought him an industrial type blender that he saw at the State Fair, where some guys were doing demos powderizing marbles. It is heavy duty and my husband liked it a lot and cleaning up is easy. He tried and experimented with different kinds of fruits or vegetables that can be can mixed together. Most of the juices you won't want to smell bu it didn't take him long before he finally came up with what he liked the best.


Here's his basic mix with his Smoothie concoction: a banana, an apple, an orange and a piece of carrot. You're probably thinking "what is the carrot doing with those fruits"? Honestly, it took me awhile to get use to it. A carrot in the fruit smoothie is somewhat a misfit as the Juiceman tells you that you can't mix vegetables with fruits when juicing. My husband said this isn't juicing, but a smoothie..ing (if there's such a word) ahh maski na! it has a physcological effect di ba?! I know how much nutrients a carrot has, so I had to force myself to like it and eventually, I like it! I really do! Actually, if I served a glass of this smoothie without telling you that there's some carrot in there, you can't even tell there's some in it because you can't taste the carrot at all.


To the basic fruits (and carrot), he adds whatever fruits we have available. The picture above are of pineapple, peaches and grapes that I had frozen. If strawberries are in season, I buy them in bulks and freeze them too. I love my smoothie with strawberries.


For this particular smoothie:
Put in the blender a cup of orange juice, then the banana, peeled orange, sliced apple, sliced carrot, then the frozen grapes, pineapple, peaches and about 3-4 ice cubes. Blend until smooth.
NOTE:
Just remember to put liquid in the blender first followed by the softiest ingredient. Always put in ice cubes on top.


Monday, November 3, 2008

#29_ Spanish Rice and Beef Casserole

This casserole is so good that even a persnickety eater like my husband will ask for seconds. I picked up this recipe from one grocery store at their produce department where they have a rack of different recipe cards, and were free. This recipe is very simple and easy to cook.


What I did differently which wasn't mentioned in the cooking procedures was that I seasoned the slices of beef with seasoned salt and refrigerated it over night. I usually do this with steaks and fish so that the seasonings, be it dry rubs or just plain salt, will penetrate into the meat, much like the process of curing meat. The meat will be flavorful.

Ingredients:
1 lb. boneless beef top sirloin steak, 3/4" thick
2 Tbsp olive oil or canola oil
1/2 cup chopped green bell pepper
2 cloves garlic, chopped
1/3 cup chopped onion
1 cup uncooked long grain rice or Basmati Rice
1 tsp chili powder
1 can (14 oz) Mexican style diced tomatoes, undrained
1/2 cup water
1 cup frozen peas and carrots
2 tbsp. canola oil

Procedure:

1. Cut the steak lenghtwise in half and then crosswise into 1/4 inch strips. Season with seasoned salt or any kind of dry rub you have, and refrigerate it overnight
2. In a large saute pan, heat the oil over medium high heat until hot. Add the seasoned beef strips, stirring well to make sure all pieces are evenly browned.
3. When the beef are all browned, add the garlic, onion and rice and stirfry for about 5 minutes, stirring to prevent from sticking.
4. add the diced tomatoes including its juice, water and chili powder. Lower heat to medium, cover the pan and simmer for about 2-3 minutes
5. add the green and red peppers and peas and carrots and transfer to a baking dish. Cover with aluminum foil.
5. Bake in a pre-heated 350 degrees oven for 30 minutes

Note:
I had some leftover breakfast sausage in the fridge. I cut them up diagonally and mixed that in the casserole before I put it in the oven....extra yummy!!

Sunday, November 2, 2008

#28_ Crema de Frutas (Fruit Cocktail Cream Cake)

Modified version of Crema de Frutas

The secret of good Crema de Fruta is in the filling and in the base cake. There are many different versions of this cake. Some recipes call for condensed milk in the filling, some call for custard, etc. I had made the original recipe from a book by Nora Daza, a famous cookbook author, a veteran gourmet chef, and at one time a host of a TV cooking show in the Philippines. The cake was really good but baking the sponge cake and making the custard filling from scratch was not a piece of cake for me. After making it once, I had to come up with an easier version.

This is my modified version of the cake and it is my favorite!!!!
I replaced the custard filling with the cream cheese and lemon pudding filling from the Hawaiian recipe (entry #6). I also used white cake mix instead of sponge cake, although using sponge cake for the base is no doubt a lot better. Store-bought sponge cake can also be substituted. Slice it up to fit your pan(s).
The subtle flavor of the lemon pudding, combined with the cream cheese and layers of the other ingredients make this cake taste sooooo heavenly that I call it the celestialized cake.

I have been making this cake in an 11x 15 cake pan, but lately I discovered that by using 3- 8x8 aluminum square pans, I can give away 2 of them and keep one for me. I think they look festive enough for Christmas give-aways too.


You can top the cake with any kind of whipped cream

Here's my recipe:
1) CAKE:
1 box white cake mix (I like to use French vanilla cake mix)
Bake the cake according to package directions. Let cool
*please see note below.

2) FILLING:
2 packages (3.5 oz each) instant lemon pudding mix
1 package cream cheese, softened
3-1/4 cups cold milk (updated)

In a bowl beat cream cheese and set aside. In another bowl, beat pudding and milk until thick; ( food processor works best for this part) Add the cream cheese and continue to beat and mix well. Consistency should be like mayonnaise. Spread over cooled cake.
(Note: you can also use 1 box instant lemon pudding mix and 1 box of white chocolate pudding mix...excellent combination)

3) FRUIT COCKTAIL
1 large can (29.5 oz) fruit cocktail, drained well
Spread over pudding

4) GELATIN
2 envelopes unflavored gelatin
1/2 cup white sugar
1/2 cup boiling water
1 1/2 cups cold fruit juice (I used the juice of the fruit cocktail plus some orange juice)

Mix gelatin and sugar together and pour in the boiling water, stirring well until gelatin is dissolved. Add cold juice and stir. Set aside until slightly set then spread over fruit cocktail

5) APPLE JELLY (optional)
Slightly melt 1/2 cup apple jelly either in a sauce pan on top of stove or in the microwave.
Drizzle over the gelatin to glaze.

REFRIGERATE CAKE FOR AT LEAST 5 HOURS BEFORE SLICING.


*NOTE: Dec. '09
I have finally overcome my intimidation in making chiffon cakes since I posted this Crema de Fruta recipe. For the base of this cake I now use the Chiffon Cake recipe, click here. It sure makes a lot of difference.